The Portfolio Searching interface
The Searching interface includes features to enhance the library user's experience with your library. My Account and My Lists functionality help users manage their accounts and library usage. Also, library users can enjoy powerful searching through the Search bar, Advanced Search, and enhanced search facets.
For more information about what is new in Portfolio 5.2.1.3, please see these topics:
Sections in this topic
- Header and footer
- The Home page
- Searching for items
- Working with search results
- Search facets
- Interfiled search results
- Item detail display
- My Account in Portfolio
- My Lists in Portfolio
Header and footer
The header is a consistent piece of your Portfolio system, whether you are looking at search results, navigating through My Account, or working with My Lists. This allows for easy navigation to anywhere from anywhere within Portfolio.
Figure 2-1: Portfolio Header

From the header, library users can log in to (or out of) Portfolio, navigate to their My Account page, view their My Lists page, access Library Information, select their language, and access the patron help file (1). Library users can also click the Home icon (2) to go back to the profile home page at any time.
Library users can click the Library Information link (3) to find information about the library, such as location (address), phone number, hours of operation, etc. For more information about setting up what displays in your "Library Information," see Setting up "Library Information".
Library users can easily select the interface language from the Language drop-down (4). Once the user logs in to Portfolio, the language they select as their Default Language in My Account is the language that will display in the interface. For more information about setting up languages in Portfolio, see Configuring languages for a search profile.
ADA accessibility (5) enables an interface that is more accessible through keyboard commands. It reduces the use modal windows to allow the user to navigate by using the arrow and tab keys, with shortcut links displayed at the top and bottom of the page. By default, ADA mode is disabled; however, you can select the default mode for your library by profile in the Edit Profile page. For more information, see Fields: Add/Edit/Copy Profile.
Portfolio delivers a help file for library users that they can access from the header (6). It covers most features available in version 5.2.1.3. This file is customizable so that you can add, remove, or edit its content to meet your library's policies and configuration on a profile-by-profile basis.
Additionally, you can choose to create your own help file that you can upload for library users to access from the Help link.
You can also turn the patron help link on or off.
For more information about patron Help, see Setting up patron help.
If you are logged in as an Admin user, you can go to a profile's page and edit the header to include your library's own logo or image using a WYSIWYG editor. You can also make your image or logo a link to your library's website if you like. For more information, see Customizing the banner.
If you are logged in as an Admin user, you can go to a profile's page and edit the footer to include images or information about your library using a WYSIWYG editor. (For more information, see Customizing the footer.
The Home page
Here are some of the features on the Portfolio Home page.
Figure 2-2: Home page

You can customize a profile Home page, just as you have with previous versions of Portfolio. For more information, see Customizing the Home page.
In version 5.2.1.3, you have the option to turn on a Book List window (1) that will contain by default many New York Times bestseller lists.
Additionally, if you are a Symphony ILS user with an instance of Symphony Web Services, you can get a Most Popular and New Books list that are both generated by Symphony reports. If you do have access to the New Books list, you can customize it to create your own lists of newly added items. For information about setting up book lists, see Enabling and configuring book lists.
Library users can easily navigate through book lists (4), purchase a book through your library's storefront (2), and search to find a particular book list item in your library (3).
Note: If the New York Times has provided an ISBN with the record, Portfolio can perform the search using the ISBN; otherwise, it searches using the author and title.
Searching for items
Version 5.2.1.3 includes features that give library users an easy and powerful searching experience.
The Search bar is part of the heading that appears on any page within Portfolio, allowing library users the ability to search for items from anywhere in the system.
Figure 2-3: Search bar

As with previous versions of Portfolio, users can select a search target or limit (1). For more information about setting up search targets or limits, see Specifying search box options for a search profile and Configuring search limits for a search profile.
A drop-down menu allows library users to search by a specific field (for example, Title, Author, Subject, etc.) (2).
Removing Search Text
Click Delete (![]() ) (3) to quickly remove all text in the search field.
) (3) to quickly remove all text in the search field.
Search profile themes
Portfolio 5.2.1.3 comes with three delivered themes that you can choose from. For more information, see Selecting a theme.
An Advanced Search (3) option is included with this version of Portfolio that offers library users the ability to perform focused and detailed searches. You can configure the contents of the Format type, Language, and Library drop-down lists on a profile basis. For more information, see Configuring fields in Advanced Search.
Note: Federated search targets, including Academic Reserves targets, are not available in the Advanced Search page to limit searching.
Working with search results
The search results page contains numerous features that make finding library items and resources easy for library users.
Figure 2-4: Search Results page
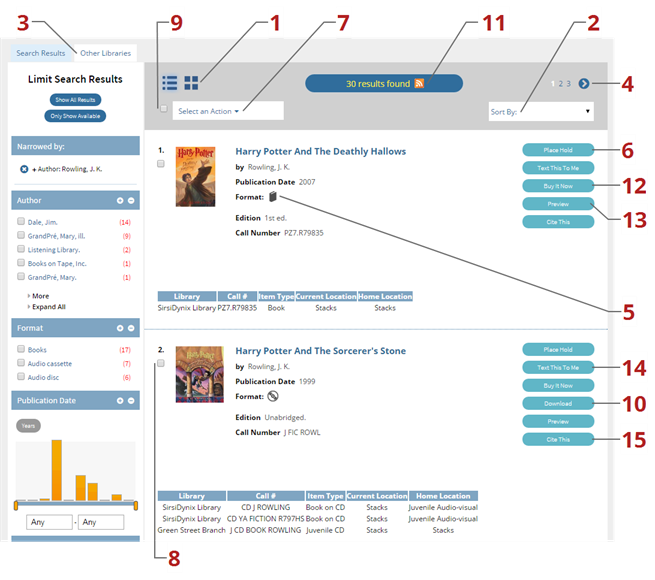
Portfolio 5.2.1.3 offers two possible search-results view layouts: a List view and a Thumbnail view. Library users can simply select the view they want (1).
Sorting search results
Library users can sort search results by selecting a sort option (2). Enterprise sorts the most relevant results and lists them in order. As an administrator, you can set the number of items to include in the sort. The fewer items included, the better performance you will see in the sort. For more information, see Fields: Add/Edit/Copy Profile.

Library users can click the Other Libraries tab (3) to go to a page of federated search results. Each database is represented by a tab displayed below the Other Libraries tab, and the results appear in the same format as library search results. Users can go back to library search results by clicking Search Results.
Paging
Navigating through pages of search results is simple. Library users can move forward and backward between pages, or select the page they want to view (4).
Format Type icons
You can configure item Format Type icons (5) to display in the search results. These icons identify what the item's format is (for example, Book, CD, Electronic Resource, etc.). For more information, see Displaying the format type icon.
Library users can easily place a hold on an item they find in the search results by clicking Place Hold (6). Users can also place a hold on one item or multiple items by selecting the item(s) checkbox and selecting “Place Hold(s)” from the Select An Action drop-down menu (7).
When library users place an item on hold, Portfolio prompts them to specify a pickup library. For more information, see Enabling patron holds.
Library users can use the Select an Action drop-down menu to place holds on items, add items to My Lists, email item information, and print item information. After selecting one item or multiple items from the search results page, library users simply select which action they want to perform from the Select an Action drop-down menu (7).
Users can also use the Select/Clear All checkbox to select or deselect all items on the search result page (9).
You can configure which of these "Action" options are available to your library users. For more information, see Configuring "Action" settings.
If your library provides ebooks to your users, Portfolio will identify those items in search results and allow library users to download them right from the search results page. To download ebooks, library users simply click Download for the item (10).
The system will prompt the library user to choose a format and will then download the ebook.
For more information, see Including Project Gutenberg ebooks.
Library users can save their searches as RSS feeds (11). To take advantage of RSS feeds, users must have an RSS enabled browser or an RSS reader.
Note: When a user saves an RSS feed for a search, the feed monitors only the first 100 search results, not the entire search. New items will probably, but may not, be included in these 100 results for which the user saved the RSS feed. Patrons interested in an RSS feed for a search should limit the search to find only the most pertinent results.
If you have subscribed to the "Buy It Now" service, your library users can click Buy It Now (12) to do an online store title keyword search on found items. When they purchase the item from the online retailer, a portion of the transaction is given to your library. For more information about subscribing to this service, contact your SirsiDynix representative.
Some ebook vendors include a short "preview" that library users can download and read before checking out the book. When an item has a preview available for download, the Preview button (13) will appear next to the item.
If your library has enabled the Text This To Me option (14) for patrons, patron can click Text This To Me next to an item on the search results page to have the item's information sent to their mobile device. Patrons can also use the Select an Action drop-down menu to text the information for multiple items at the same time.
If your library has enabled the RefWorks HTML widget, library users can generate citations for items by clicking Cite This (15) next to an item on search results displays. This option is configured in the Displays > HTML Widgets page of the Admin console. For more information, see Implementing the RefWorks HTML widget.
If you library has enabled Facebook integration, library users can “like” items from a search results page by clicking the Facebook Like button. If the library user is not already logged in to Facebook, they will be prompted to log in.
For more information about Facebook integration, see Enabling the Facebook "Share" button.
If your library has enabled the Mail this to me option for patrons, patron can click Mail this to me next to an item on the search results page to have the item mailed to the address on file at your library. Patrons can select which delivery method they want to use from the list of delivery options defined by the library. This option is turned on and off in the Edit Profile page of the Admin console.
Additionally, if your library site uses BLUEcloud Central with eResource Central and Web Services for Horizon or Web Services for Symphony 2014.10 or later, eResource Central can validate whether an ebook from an eResource Central collection can be placed on hold based on which libraries (institutions) have access to the collection. If a library user attempts to place a hold on an ebook from an eResource Central collection that their library does not have access to, eResource Central disallows the hold.
Note: This validation feature requires that a Web Services URL has been specified for the libraries (institutions) using the collection. For more information on the Web Services URL, see the "Fields: Add/Edit Institution" topic of the BLUEcloud Central Help.
This validation feature does not work for library sites that use a single sign-on solution for patron login (such as CAS).
Additionally, if your library site uses BLUEcloud Central with eResource Central and Web Services for Horizon or Web Services for Symphony 2014.10 or later, eResource Central can validate whether an ebook from an eResource Central collection can be checked out based on which libraries (institutions) have access to the collection. If a library user attempts to check out an ebook from an eResource Central collection that their library does not have access to, eResource Central disallows the checkout.
Note: This validation feature requires that a Web Services URL has been specified for the libraries (institutions) using the collection. For more information on the Web Services URL, see the "Fields: Add/Edit Institution" topic of the BLUEcloud Central Help.
This validation feature does not work for library sites that use a single sign-on solution for patron login (such as CAS).
Search facets
Search facets let patrons limit a search after results have been located. For more information, see Configuring the facet display for a search profile.
Figure 2-5: Facets
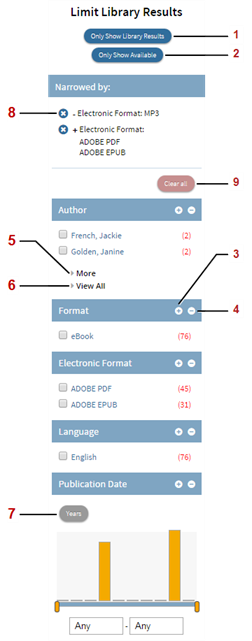
The Only Show Library Results button (1) lets library users limit their search results to only those items that are available at their library. This option allows patrons to quickly switch between library-only and interfiled search results displays.
The Only Show Library Results button acts as a toggle — “Only Show Library Results” or “Show All Results” — that library users can use to restrict or expand their search results.
The Show Only Available button (2) lets library users limit their search results to only those items that are available for checkout.
The Show Only Available button acts as a toggle — “Show Only Available” or “Include Unavailable” — that library users can use to restrict or expand their search results.
For more information, see Setting up availability.
Include/Exclude
Version 5.2.1.3 lets library users select whether they want to include or exclude facets within a single field.
For example, if a library user wanted to do research on William Shakespeare, but did not want to get search results that included works actually written by Shakespeare, they could do the following:
After doing a search for “Shakespeare,” the library user could select the facet checkbox next to “Shakespeare, William” in the Author field, and then click the exclude icon (4). The search results would then update to include relevant results that do not include William Shakespeare as the author.
Note: Library users can simply click a search facet to limit their search results by that particular facet, just as they have in past versions of Portfolio. In other words, clicking on a facet is the same as selecting its checkbox and clicking the include icon.
Multiple selection
Library users can select multiple facets within the same field to either include in or exclude from the search results.
For example, if a library user wanted to further that search by only including items that are in French and German, they could select the facet checkboxes next to “French” and “German” in the Language field, and then click the include icon (3). The search results would update to include only items that are in French and German.
Facet viewing options
Library users can use the More and Fewer links (5) to expose or hide facets incrementally within a field, as they have in the past. Now in version 5.2.1.3, library users can also select the View All (6) to view all of the navigators in a dialog where they can select which to show or remove from the search.
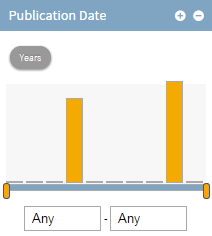
The Publication Date facet has been updated with two possible views that library users can choose between. The first view is a Graph view where library users can use the mouse to drag date range markers, or they can manually enter a range in a text box . Library users can also choose to view a list of results by publication year (7).
When library users include or exclude facets in their search results, those limits appear in the Narrowed by section. Facets that are included will be preceded by a plus (+) sign; those that are excluded will be preceded by a minus (–) sign.
To remove a limit, library users can click the remove icon (8). To remove all limits, they can click Clear all (9).
Interfiled search results
If your library has enabled interfiled search results, the search results page will have library results combined with results from EDS.
Figure 2-6: Interfiled Search Results page
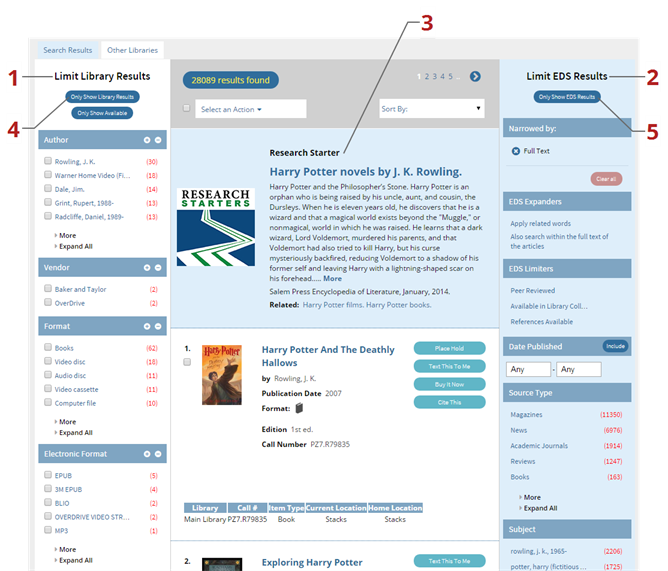
If your library has enabled interfiled search results, then patrons will see a special search results display when they perform a search against all search targets. The interfiled search results page has two sets of search limits, one for library results (1), and one for EDS results (2). Search results are listed in a combined area in the middle of the page, but are highlighted according to the type of search result they represent, with a white background for library search results, and blue background for EDS results. The search limits have corresponding background colors.
If your library has enabled the research starter section, some searches return a small amount of research information as the first search result (3). Patrons can use this information to get started on research. Patrons can click the title of the research starter or the More link to display more information about a research topic.
When viewing interfiled search results, patrons can apply facets just like while viewing only library or EDS results. However, when a patron applies a facet for one type of search results, all of the search results of the other type are automatically excluded. For instance, if a patron applies a library search limit, not only are the appropriate library results filtered out, but all the EDS results are filtered out as well.
Item detail display
The item detail display includes information and links to functionality such as placing a hold or exporting data to a citation management service.
Figure 2-7: Detail display
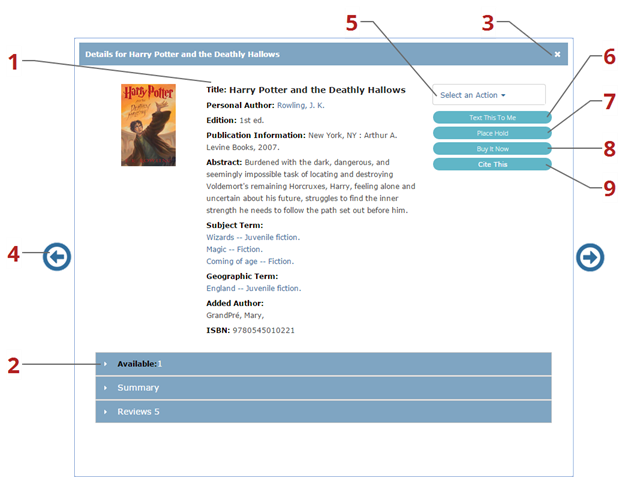
In version 5.2.1.3, an item’s detail display is a popout window that does not require loading a new page. The only time a detail display opens a new page is when the user has enabled ADA Accessibility.
Additionally, the detail display is configurable so you can make it more inviting and friendly to library users. For more information about setting up the detail display, see Configuring the item detail display.
To close the detail display, library users can either click the Close icon (3), or simply click anywhere outside the popout window.
Accordions
Accordions appear on an item’s detail display view to contain information about item availability, on-order status (if set up in ), and any enriched content your library may subscribe to (for example, summaries, reviews, excerpts, etc.) (2). For more information about setting up enriched content, see Enabling and setting up enriched content.
Paging
Library users can page to next or previous items from within the detail display (4). Items will be appear in the same order as in the search results page.
Format Type icons
You can configure item Format Type icons to display on the item detail display. This icon identifies what the item's format is (for example, Book, CD, Electronic Resource, etc.). For more information, see Displaying the format type icon.
Library users can use the Select an Action drop-down menu to place a hold on the item, add the item to My Lists, email item information, and print item information. Library users simply select which action they want to perform from the Select An Action drop-down menu (5).
You can configure which of these "Action" options are available to your library users. For more information, see Configuring "Action" settings.
If your library has enabled the Text This To Me option (6) for patrons, patron can click Text This To Me to have the item's information sent to their mobile device. Patrons can also use the Select an Action drop-down menu (5) to text the information.
Library users can easily place a hold on the item by clicking Place Hold (7). Users can also place a hold on the item by selecting “Place Hold” from the Select an Action drop-down menu (5).
When library users place an item on hold, Portfolio prompts them to specify a pickup library. For more information, see Enabling patron holds.
If you have subscribed to the "Buy It Now" service, your library users can click Buy It Now (8) to do an online store title keyword search on found items. When they purchase the item from the online retailer, a portion of the transaction is given to your library. For more information about subscribing to this service, contact your SirsiDynix representative.
If your library has enabled the RefWorks HTML widget, library users can generate citations for items by clicking Cite This (9) on an item's details display. This option is configured in the Displays > HTML Widgets page of the Admin console. For more information, see Implementing the RefWorks HTML widget.
If the item is an ebook, Portfolio will allow library users to download it from the item’s detail display view. To download the ebook, library users simply click Download.
The system will prompt the library user to choose a format and will then download the ebook.
Some ebook vendors include a short "preview" that library users can download and read before checking out the book. When an item has a preview available for download, the Preview button will appear.
If you library has enabled Facebook integration, library users can “like” items from a search results page by clicking the Facebook Like button. If the library user is not already logged in to Facebook, they will be prompted to log in.
For more information about Facebook integration, see Enabling the Facebook "Share" button.
If your library has enabled the Mail this to me option for patrons, patron can click Mail this to me next to an item on the search results page to have the item mailed to the address on file at your library. Patrons can select which delivery method they want to use from the list of delivery options defined by the library. This option is turned on and off in the Edit Profile page of the Admin console.
Additionally, if your library site uses BLUEcloud Central with eResource Central and Web Services for Horizon or Web Services for Symphony 2014.10 or later, eResource Central can validate whether an ebook from an eResource Central collection can be placed on hold based on which libraries (institutions) have access to the collection. If a library user attempts to place a hold on an ebook from an eResource Central collection that their library does not have access to, eResource Central disallows the hold.
Note: This validation feature requires that a Web Services URL has been specified for the libraries (institutions) using the collection. For more information on the Web Services URL, see the "Fields: Add/Edit Institution" topic of the BLUEcloud Central Help.
This validation feature does not work for library sites that use a single sign-on solution for patron login (such as CAS).
Additionally, if your library site uses BLUEcloud Central with eResource Central and Web Services for Horizon or Web Services for Symphony 2014.10 or later, eResource Central can validate whether an ebook from an eResource Central collection can be checked out based on which libraries (institutions) have access to the collection. If a library user attempts to check out an ebook from an eResource Central collection that their library does not have access to, eResource Central disallows the checkout.
Note: This validation feature requires that a Web Services URL has been specified for the libraries (institutions) using the collection. For more information on the Web Services URL, see the "Fields: Add/Edit Institution" topic of the BLUEcloud Central Help.
This validation feature does not work for library sites that use a single sign-on solution for patron login (such as CAS).
My Account in Portfolio
Library users can access their My Account from the Portfolio header, though if they are not already logged in, the system will require them first to log in.
Within the login dialog box you can activate a link for self-registration that new patrons can use to initiate the registration process. You can configure the link to begin the process, include the entire process, or open a web page with instructions that explain the registration process for your library. For more information, see Setting up a self-registration page.
If Portfolio connects to a Horizon ILS, you can also add a "Forgot your PIN?" link to the login dialog box that lets the patron have Portfolio email the PIN to the email address in the patron's library account. For more information, see Fields: Add/Edit Symphony Web Services Authentication Server.
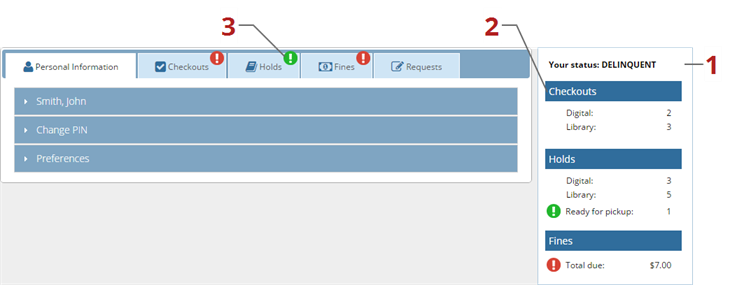
My Account consists of multiple parts: Personal Information, Checkouts, Holds, Fines, and, if your library uses Horizon as its ILS, Additional Information. If you have enabled patron requests at your library, My Account also includes a Requests section where patrons can view any requests they have submitted. It also displays a summary or overview box (1) that displays the user’s status, number of checkouts, number of holds, and fines amounts. It also displays the number of overdue items and the number of hold items that are available for pickup. Library users can click on the headings in this box (Checkouts, Holds, or Fines) to navigate to these tabs.
Alert icons (2) will appear on the tabs to notify the library user that they need to take action on something in their account. For example, if there are overdue items, an alert icon will appear on the Checkouts tab. Likewise, if the user has holds available for pickup or new fines to pay, alert icons will appear on the respective tabs.
For information about setting up My Account for a profile, see Enabling and configuring My Account settings.
Figure 2-8: My Account
Personal Information
Depending on your Portfolio and Symphony or Horizon ILS configurations, the Personal Information tab contains four accordion sections: User information, Change PIN, Preferences, and Group Properties.
User information
The User information tab heading will display the name of the library user. The information in this section is the user’s personal information projected from the Symphony or Horizon system. Depending on your ILS settings, it will display things like the user’s address, phone number, email address, etc. The library user may also be able to edit this information themselves depending on the ILS settings. You can turn manage these two options on a profile basis. For more information, see Fields: My Account Settings.
Change PIN
The Change PIN section is where the library user can go to change their PIN. All they need to have is their existing PIN to change to a new PIN.
Note: You can configure whether or not library users have access to this feature. For more information, see Enabling and configuring My Account settings.
The Preferences section is where library users can go to set up their personal Portfolio preferences.
Depending on your configuration, this section contains these options:
- Default Language lets the library user select the language that will be used when they log in to Portfolio. For information about setting up language options, see Configuring languages for a search profile.
- Default My Account Tab lets library users select which tab will be open when they go into My Account.
- Default Checkouts View lets library users specify whether the Checkouts tab displays their digital checkouts or library checkouts when they first open the tab.
- Default Holds View lets library users specify whether the Holds tab displays their digital holds or library holds when they first open the tab.
- Preferred List lets the library user select which of their My Lists they want as their default list.
- Preferred Pickup Library lets the library user select which library they want to use as their pickup library. For information about setting up pickup libraries, see Managing pickup libraries.
-
EDS Display Mode allows the library user to override the default Interfile EDS Results setting chosen in the Admin interface and select how the EBSCO Discovery Service and library search results will be merged and displayed. The available options are Display EDS results in a separate taband Use library default setting.
If your library elects to use any EDS search target with Portfolio, an EDS Display Mode field automatically appears in the Preferences accordion of the My Account Personal Information tab, even when Interfile EDS Results has not been selected in Admin help.
If your library does not use any EDS search target, the EDS Display Mode field does not appear in My Account.
-
Show my checkout history lets you specify if you want the system to display your checkout history in the Checkouts tab.
If you have selected Show my checkout history and the History tab does not show current activities, make sure that Record my checkout history has also been selected.
-
Record my checkout history lets you specify if you want the system to keep track of the items you check out from the library.
Your checkout history will not display the recent history unless both Show my checkout history and Record my checkout history are selected.
Note: Because the Horizon ILS does not track checkout history, these options are not available through Horizon Web Services.
SMS Notifications
SMS Notifications is available only to libraries using the Symphony ILS with Web Services. Patrons can use the SMS Notification section to add cell phones and subscribe to text alerts on that phone. The phones must be capable of receiving text messages. For more information, see Fields: My Account Settings.
Group Members
Group Members is available only to libraries using the Symphony ILS with Symphony Web Services. If the library user is part of a group, the Group Properties section projects information about that group from your Symphony system. Depending on your Symphony settings, it will display things like the names of other users in the groups, their user IDs, statuses, etc.
Note: Because the Horizon ILS does not support groups, these options are not available through Horizon Web Services.
Checkouts
The Checkouts tab contains information about the library user’s checkouts. Depending on your Portfolio, ILS, and ILS configurations, this tab includes three accordion sections: Library Checkouts, Group’s Current Checkouts, and My Checkout History. Because Horizon not does support groups or track checkout history, the only sections available to systems using the Horizon Web Services are Library Checkouts and Digital Checkouts.
If the user has overdue items, there will be an alert icon on this tab.
Figure 2-9: Checkouts
If your library has subscribed to eResource Central, the Checkouts tab includes a separate accordion section named Digital Checkouts. Patrons can view the eBooks and other electronic resources that they have currently checked out in this accordion.
Library Checkouts
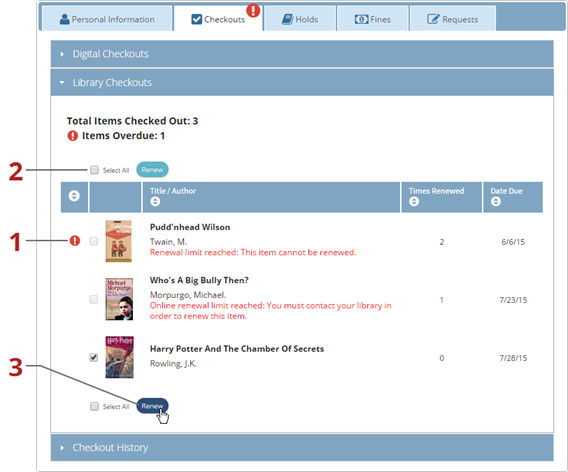
The Library Checkouts section displays all the physical items that the library user currently has checked out. If the user has any items that are overdue, those items will be preceded by an icon and will appear at the top of the list (1).
From this page, library users can click on an item to view its detail display. They can also select a single item or multiple items in the list to renew (2). If items cannot be renewed (because of circulation rules, etc.), Portfolio will notify the user that the item cannot be renewed. Also, at some libraries there are fines associated with renewing items. If that is the case at your library, the user will be notified that they will be charged a fine before they confirm the renewal.
Digital Checkouts
The Digital Checkouts section displays all the digital items that the library user currently has checked out. They can also view details of the items or return items. Some items cannot be returned and will simply expire at the end of the checkout period.
Group’s Current Checkouts
If the library user belongs to a group, this section will display all the items that are currently checked out by the group. If there are any overdue items, those items will be preceded by an icon and will appear at the top of the list.
Note: Because the Horizon ILS does not track checkout history, these options are not available through Horizon Web Services.
My Checkout History
If you have configured Portfolio and your Symphony system for users to keep a checkout history, your library users can go to this section to view items that they have checked out, when they checked them out, and when they were returned.
You can also configure Portfolio to allow users to choose if they want to keep a checkout history. They can set this up in their My Account Preferences.
Holds
The Holds tab contains information about the user's holds and group holds. Depending on your Portfolio and Symphony or Horizon ILS configurations, this tab includes two accordioned sections: Library Holds and Group Holds.
If your library has subscribed to eResource Central, the Holds tab includes a separate accordion section named Digital Holds. Patrons can view the eBooks and other electronic resources that they have currently placed on hold in this accordion.
If the user has holds that are ready for pickup, there will be an alert icon on this tab.
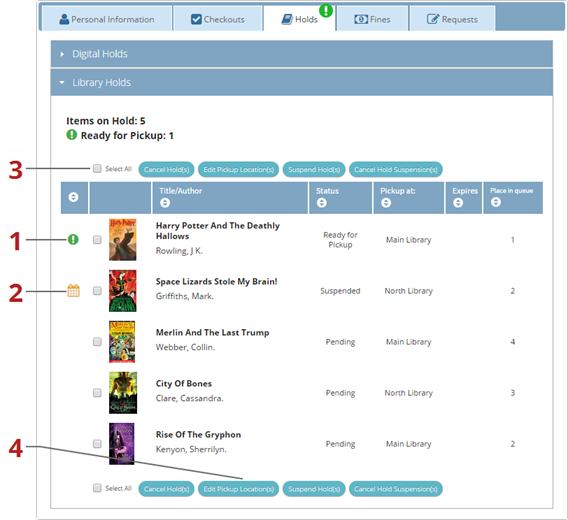
Figure 2-10: Holds
Library Holds
The Library Holds section lists the items that the library user currently has on hold. Depending on your configuration, this list will display things like cover art, Title/Author, hold status (active, suspended, etc.), pickup library, and hold expiration for each held item.
If the user has items that are ready for pickup, those items will be preceded with an icon and will appear at the top of the list (1). Any holds the user has suspended also appear towards the top of the list, but have calendar icons next to them (2)
On this page, library users can click on an item to view its detail display. Users can select one item or multiple items for the following actions: canceling the hold, editing the pickup location for the hold, suspending the hold, or canceling suspended holds (4).
At some libraries, there are fees for canceling holds. If that is the case at your library, the user will be notified that they will be charged a fine before they confirm the hold cancellation.
Digital Holds
The Digital Holds section lists the items that the library user currently has on hold. Depending on your configuration, this list will display things like cover art, Title/Author, and place in queue for each held item.
If the user has items that are ready to download, those items will be preceded with an icon and will appear at the top of the list.
Group Holds
The Group Holds section lists the items that the library user’s group currently has on hold. Depending on your configuration, this list will display things like cover art, Title/Author, hold status (active, suspended, etc.), pickup library, and hold expiration for each held item.
At some libraries, there are fees for canceling holds. If that is the case at your library, the user will be notified that they will be charged a fine before they confirm the hold cancellation.
Note: Because the Horizon ILS does not support group holds, these options are not available through Horizon Web Services.
Fines
Library users can go to the Fines tab to view and pay their library fines. Depending on your Portfolio and Symphony or Horizon ILS configurations, this tab includes five accordioned sections: Accruing Fines, Current Fines, Group Accruing Fines, Group Fines, and Payment History.
| |
Because Horizon does not support groups, the Group Accruing Fines and Group Fines sections will not appear for systems using the Horizon Web Services. |
If the user has any new or unpaid fines, there will be an alert icon on this tab.
| |
You can configure payment options for your library users and specify a minimum payment amount. For information, see Managing payment accounts and Configuring My Account settings. |
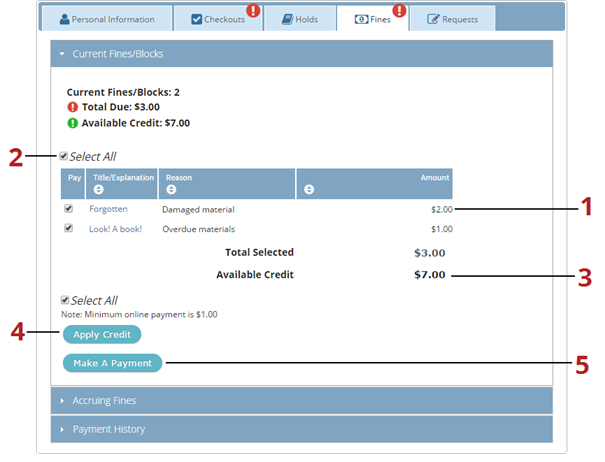
Figure 2-11: Fines
Accruing Fines
Library users can view their accruing personal fines in this section.
Current Fines
The Current Fines section displays all fines assessed to the library user. These fines are listed per item, and users can click the item titles to open to the item’s detail display. This list will display the reason for the fine and the fine amount for each item, as well as the total amount due. If your library is set up for credit amounts, this section will also display the amount of available credit the user has.
This section also displays any accruing fines with the amount that is being assessed and the rate at which it is being assessed (for example, “$1.00/day”) (1).
Users can go to Current Fines to pay their fines to the library. They can choose to pay select fines or all fines at the same time by selecting the checkboxes for the fines they wish to pay (2). The amount they select is added and displayed in the Total Selected box (3). They can apply any library credit they have to their payment by clicking Apply Credit (4). Users can then click Make Payment (5) to go to the payment site and pay their fines. Note: you can require patrons to accept a terms and conditions agreement before they can make the payment. For more information, see Fields: My Account Settings.
Group Accruing Fines
Users who belong to a user group can go here to see accruing fines assessed to users in the group.
Group Fines
Users who belong to a user group can go here to see the fines assessed to all users in the group.
Payment History
Library users can go to the Payment History section to see a history of any payments they have made to the library. This list will display the date a payment was made and the amount.
Additional Information
This tab is currently available only to certain libraries. For Horizon customers, it contains Miscellaneous Patron Alerts which alerts library users to new information relevant to their account, including any blocks on their account. This tab also contains any My Account information that is linked to outside applications that have been integrated into Portfolio.
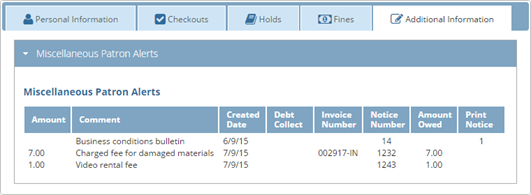
Library users can view the Miscellaneous Patron Alerts section to view any account information that doesn't fit in the other tabs but that you want to communicate to the user.
Requests
This tab is only available if your library allows you to make requests and has enabled you to track those requests in My Account. If this tab is enabled, you can view any previously submitted requests here. You can view the type, details, and date of any request you have made. Additionally, you can manage the requests you have made from this tab.
For more information about submitting requests, see The Portfolio Searching interface.
This tab is only available to patrons if you have selected to display the tab to patrons in the Admin console. This tab contains each request that patron has submitted to the library as well as several options for managing those requests.
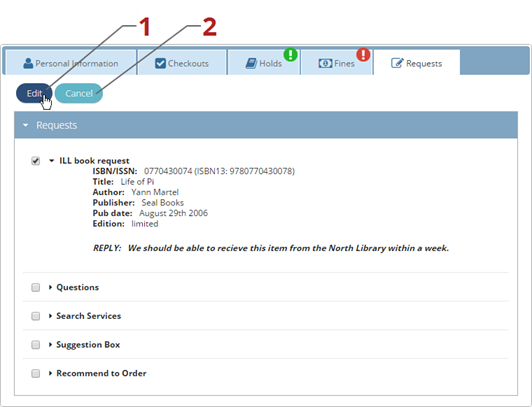
Edit Request
The Edit button (1) allows patrons to edit any request they have made. These changes are tracked and can be viewed by library staff.
Reply
Note: You cannot view any follow-up messages you send to your library after sending your initial request.
You can configure Requests so that you can reply to any patrons' requests. When you do this, they can view your reply in My Account. If they want to respond to your reply, they can do so by choosing the Reply button. This opens up a display that allows them to view and add to the current conversation.
Cancel
Patrons can cancel their requests from My Account. When they cancel a request, the library is notified that they have done so.
My Lists in Portfolio
Library users can access their My Lists from the Portfolio header. Users can add items to and view a Temporary List without being logged in to Portfolio. Once users log in to Portfolio, they can access and manage their own saved lists, as well as transfer items from their Temporary List to their saved lists.
For information about enabling My Lists for a profile, see Enabling My Lists.
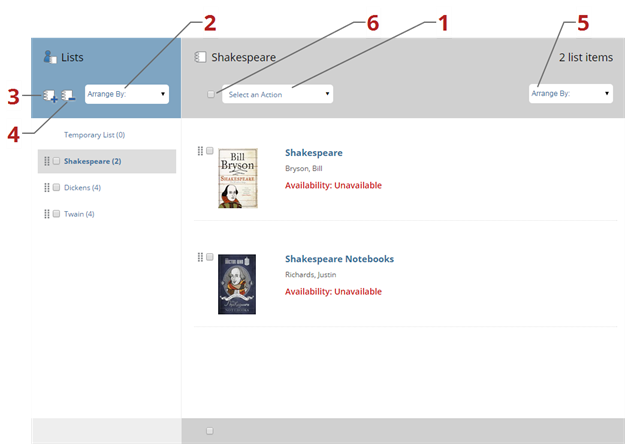
Figure 2-12: My Lists
Adding items to My Lists
Library users can add items to their My Lists from the search results page and from an item’s detail display.
If a library user wants to save items to a list without first logging in to Portfolio, they can save them to the Temporary List. The Temporary List will remain active for the user until their session ends. Once a user logs in to Portfolio, they can move items from their Temporary List to any of their saved lists. Temporary lists are cleared when the session has expired.
My Lists are saved lists that library users can create and then add items to. In order to access their My Lists, library users must be logged in to Portfolio. Users can create new lists or delete existing lists at any time. Once the user creates a list, it will appear as an option when they click Add to My Lists from search results or an item’s detail display.
To view a list, library users simply click the list they want to view from under the Lists heading. That list will then appear in the List window.
Once a library user is logged in to Portfolio, they can create new lists and delete existing lists. To add a new list, users can click the Add List icon (3). To delete existing lists, users can select the lists they want to delete and click the Delete Lists icon (4).
Library users can click on an item in a list to view it’s detail display.
Library users can use the Select an Action drop-down menu (1) to place holds on items, email item information, and print item information. Additionally, they can delete selected items from the list, move items from the list to another list, copy items from the list to another list, or save an entire Temporary list as a new list.
After selecting one item or multiple items from a list, library users simply select which action they want to perform from the Select an Action drop-down menu. If they are moving or copying items to another list, Portfolio will prompt them to specify which list they are moving or copying items to.
Users can also use the Select/Deselect All checkbox to select or deselect all items on the in the list (6).
Arrange lists
Library users can arrange the display order of their lists in two ways. The first is by using the Arrange By drop-down (2) beneath the Lists heading. This allows users to choose if they want to arrange their lists by name ascending, name descending, date added ascending, or date added descending.
Users can also manually arrange the display order of their lists by dragging and dropping the lists into an order of their choosing.
Arrange items
Library users can arrange the display order of items in their lists in two ways. The first is by using the Arrange By drop-down (5). This allows users to choose if they want to arrange their list items by name ascending, name descending, date added ascending, or date added descending.
Users can also manually arrange the display order of their list items by dragging and dropping the items into an order of their choosing.